Implementing the OpenChain Specification


As my industrial placement year comes to an end, so does my time with the OpenChain project. Over the past year I have worked through the full lifecycle of a project, from ideation & envisioning, to planning, implementation, testing, deployment, roll-out and maintenance to ensure that we are open-source license compliant, and therefore meet the specifications of the OpenChain project. Starting with discovering what open-source licenses are, to collecting and processing data, and finally to displaying it in a way that is useful to the company. In this blog I am going to take you through the processes and explain how we adapted and created our processes in checking our whole codebases components.
What is OpenChain
The OpenChain Project was set up by the Linux Foundation to create an ISO standard for creating, using and modifying open-source software. Creating an ISO standard like this is important as more software is being created and used extensively without having a clear baseline of quality or structure. During the course of the year, the aim of the OpenChain project has expanded. Initially about license compliance, then it included threats, and now it's looking at open source contribution process management.
Organisations that have OpenChain have greater control and knowledge about how their open-source software is being created or used, meaning they have a reduced risk of misuse and therefore less legal risk.
If you would like some extra information on what OpenChain is, the risks behind open-source software, and a more in-depth explanation of the specification, I have written a series of blogs:
- What is OpenChain and why is it useful? - Part 1
- What is OpenChain and why is it useful? - Part 2 - What are the risks with open source software?
- What is OpenChain and why is it useful? - Part 3 - the OpenChain specification explained
- Exploring OpenChain from License Compliance to Security Assurance
Discovery
The first few weeks of the project I worked on getting familiar with the different terminology involved around licensing. This included the different types of open-source licensing:
- Permissive - a free-software license that involved minimal restrictions on using the software e.g. MIT or Apache 2.0
- Weak Copyleft - allow the code under the license to be combined with code under more permissive licenses without imposing the full copyleft requirements on the entire combined work e.g. LGPL
- Strong Copyleft - any derivative of the software must also be distributed under the same strong copyleft terms
I learnt how compliance means you are satisfying the rules of the licenses you are using. I also started to understand the risks involved:
- Legal issues
- Ethical issues impacting companies reputation
- Data breaches due to software vulnerabilities
If you want to know more about licensing and compliance I recommend taking these two courses:
- Introduction to Open Source License Compliance Management - By the Linux Foundation
- Getting it right with open-source software - By Source Code Control
Generating SBOMs
A software bill of materials (SBOM) is a list of all software components that make up a piece of software. Having an SBOM means that you can track all the components required to run your code and ensure they satisfy the license rules. I wrote about SBOMs in greater depth in part 3 of my OpenChain blog series.
We wanted to generate SBOMs for all our repositories across all our codebases so we used a tool called Covenant, created by Patrik Svensson, which generates an SBOM from either a directory or a specific file from .NET 5, .NET 6, .NET Core or NPM projects. To get the SBOM you simply have to run one command:
dotnet covenant generate
We have CodeOps processes to manage our build scripts across our GitHub Organisations and repositories meaning we can easily modify the tasks that run within the build. This meant we could easily add in Covenant to generate our SBOMs.
There are a growing number of SBOM formats, however the two most popular: CycloneDx and SPDX are the formats that Covenant will generate. The current versions don't add extensibility but Patrik (creator of Covenant) added a custom format which allowed us to capture more custom metadata, for example the branch that was being reviewed and the GitHub organisation it was being taken from.
The SBOMs are stored as JSON files which contain both a Components and Dependencies section. The Components section contains each component that has been identified along with information about it's license. The Dependencies section brings together all the components and lists for each component which dependencies it has, which when mapped out would create a big tree-like structure of dependencies.
Below is a cut down version of what an SBOM could look like, you can see there is basic metadata at the top, then the components and dependencies section:
{
  "Name": "ExampleProject",
  "Version": "1.0.0",
  "ToolVendor": "Covenant",
  "ToolVersion": "1.2.3",
  "Metadata": [
    {
      "Key": "git_sha",
      "Value": "a1b2c3d4e5f6g7h8i9j0k1l2m3n4o5p6"
    },
    {
      "Key": "git_branch",
      "Value": "main"
    },
    {
      "Key": "git_repo",
      "Value": "exampleuser/example-repo"
    }
  ],
  "Components": [
    {
      "Data": "2.0.0",
      "UUID": "a1b2c3d4-e5f6-4g7h-8i9j-k0l1m2n3o4p5",
      "Purl": "pkg:toolco/dotnet/example@2.0.0",
      "Name": "example",
      "Version": "2.0.0",
      "Groups": [
        "ExampleProject.sln"
      ],
      "IsRoot": true
    },
    {
      "Data": "4.7.0",
      "UUID": "24b55bc8-f9dd-481c-b43f-bd8d45f0410c",
      "Purl": "pkg:nuget/System.Security.Principal.Windows@4.7.0",
      "Name": "System.Security.Principal.Windows",
      "Version": "4.7.0",
      "Kind": "Library",
      "Copyright": "© Microsoft Corporation. All rights reserved.",
      "Hash": {
        "Algorithm": "SHA512",
        "Content": "F30A16D34C8792DB60B2240363A8B200CAB28BC2C7441405CF19ABF71DBF5FB0BF3BD1CBEC4D9B5EB4CF73EC482E4505D08D80AFDEF00B2B4B3BB56D6D4CAE96"
      },
      "License": {
        "Id": "MIT",
        "Name": "MIT License",
        "Url": "https://licenses.nuget.org/MIT"
      }
    }
  ],
  "Dependencies": [
    {
      "Purl": "pkg:toolco/dotnet/example@2.0.0",
      "Dependencies": [
        "pkg:nuget/MarkdownUtils@1.0.0",
        "pkg:nuget/ToolExtensions@2.0.0",
        "pkg:nuget/ThirdPartyLib@3.0.0"
      ]
    },
    {
      "Purl": "pkg:nuget/ExampleLibrary@3.1.2",
      "Dependencies": [
        "pkg:nuget/Microsoft.Build.Tasks.Git@1.1.1"
      ]
    },
    {
      "Purl": "pkg:nuget/ExampleLibrary.GitHub@3.1.2",
      "Dependencies": [
        "pkg:nuget/ExampleLibrary@3.1.2",
        "pkg:nuget/Microsoft.SourceLink.GitHub@1.1.1"
      ]
    }
  ]
}
Processing the SBOMs
Now that we were able to generate our SBOMs, we stored them in our CodeOps Azure Data Lake Storage Gen2 instance in Azure. We are keeping all historic versions so that if we ever need to look back we have the original SBOMs. As JSON is structured data but doesn't have a schema, we needed to be able to process and clean it so we could extract the parts that were most important to us.
This is when we created the SBOM Wrangler, a PySpark notebook in Azure Synapse Analytics that would load in the data, transform it and then save it back to the datalake. The main benefit of using PySpark is making use of being able to horizontally partition the work, meaning we can process large amounts of data really quickly. To do this we had to design our code in a certain way (e.g. not using for loops) so that it was easily able to be partitioned.
As we had nested data in our JSON file, it made it more difficult to convert the data to be more structured. This was because we had to follow the schema it had, meaning if we imported a different format of SBOM, our wrangler wouldn't work. In order to make use of the partitioning we used a function called explode which explodes our nested array into individual rows:
Components = df.select(
    explode(col('Components')),
    col('Name'),
    col('src_platform'),
    col('org'),
    col('repo'),
    col('file_timestamp'))
Below is an example of the table that we were generating, along with the column names and types of data we were using:
| Name | Purl | UUID | License_ID | License_Name | License_Url | Version | isRoot | Data | Kind | Hash_Algorithm | Hash_Content | Copyright |
|---|---|---|---|---|---|---|---|---|---|---|---|---|
| PySparkExample | pkg:covenant/dotnet/PySparkExample@1.0.0 | fd90c2b1-4450-4c72-b3f2-f395ba161749 | 1.0.0 | true | 1.0.0 | |||||||
| Newtonsoft.Json | pkg:nuget/Newtonsoft.Json@13.0.2 | e2701915-6fcc-4a4c-aa5e-f068b43bebe4 | MIT | MIT License | https://licenses.nuget.org/MIT | 13.0.2 | 13.0.2 | Library | SHA512 | D743AE673BAC17FDBF53C05983DBA2FFDB99D7E6AF8CF5FE008D57AA30B6C6CA615D672C4140EEC516E529EB6AD5ACF29C20B5CC059C86F98C80865652ACDDE1 | Copyright © James Newton-King 2008 |
Creating scores for each SBOM
Now that we had collected the data we needed about each repository, we were going to apply some business logic to it which would give us a score for each SBOM. Our business logic included which licenses we were going to allow to be used, which ones we weren't, and for the case in which they didn't have a license, would we allow the given copyright notice.
Policy Hierarchy
From here we created a policy hierarchy. Policies may need to be tailored for individual repositories but this would be onerous to manage on a per-repository basis. So, using three categories: repository, organisation and company. For each different level, if there exists a policy that is lower down, that takes precedence over the higher level. For example, if there is a repo-specific policy, that will override the org-specific policy.
We stored this information in our OpenChain repository under a set of different files. This allowed us to be able to access it from any of our other repositories and create a workflow to change it into a JSON file. Here is the structure of the file system:
.
├── company
│ └── company-level.yaml
├── organisation
│ ├── org-level-endjin.yaml
│ └── org-level-corvus-dotnet.yaml
└── repository
└── repo-level-corvus-extensions.yaml\
Each yaml file followed the same structure. Here is an example file:
### Corvus License rule set
accepted:
  - Apache-2.0
  - BSD-2-Clause
  - BSD-3-Clause
  - MIT
  - AGPL-3.0-or-later
rejected:
  - GPL-2.0
  - GPL-3.0
copyright:
  - endjin
  - microsoft
  - corvus
overrideAccept:
  - Marain.Services.Tenancy
overrideReject:
  - Newtonsoft.Json
Each different category contributes to creating a score:
- accepted: lists the licenses for this policy that are alright to use
- rejected: lists the licenses for this policy that would break compliance and are not allowed
- copyright: lists the key words identified in a copyright notice that would allow the component to be used
- overrideAccept: lists the components that are always allowed, no matter their license
- overrideReject: lists the components that are never allowed, no matter their license
We decided to add functionality to override the license policy for certain components as we found we were catching out some licenses that were our own. The Marain.Net open-source repositories are licensed with the AGPL 3.0 license which is a strong copyleft license. It enforces open source on all derivative work that uses the component. Generally, we don't want to use copyleft licenses as it may require us to open source some code that we wish to keep as proprietary software rather than permissive. However, as it's our own code, we are fine using it, meaning we want to override our current rules and accept those specific Marain repositories that have the AGPL 3.0 license.
To use this data later on in our SBOM Analyser we needed it to be in JSON form, so created a workflow to run a script that would pull together all the yaml files and save it as a JSON file to the datalake.
SBOM Analyser
We wanted to be able to produce scores for our SBOMs. The scores represent how many accepted, rejected and unknown components there are for each repository (SBOM). To determine whether they are accepted or not, it is checked against the policy for that specific repository. If there exists a policy for the repository, then that is used, else if there is a GitHub organisation policy, that is use, else there is a default company level policy as a default when no other has been defined. If a component exists in teh accepted list, it's accepted, same for rejected, if it's not on either list it checks for a specific match from the copyright section against the copyright notice. If none of those match, it gets assigned unknown.
We want to be able to produce scores for our SBOMs in two different places:
- Synapse: generating scores for all the data we have produced at once
- GitHub: generating a score for an SBOM in a PR when build runs to see if there are any breaking changes
Pandas is now supported by PySpark so we were able to design a package that would run in both basic Python code and in PySpark (still making use of the horizontal partitioning). To do this, again similar to the SBOM Wrangler, we had to ensure we didn't use
forloops and instead other functions that could be partitioned out, whilst still working in normal Python.
We packaged the code up using poetry which allowed us to list the dependencies we needed and bundle it up into a .whl file which could be used in both our build workflows and in Synapse.
The tool consists of three separate parts:
- SBOM Wrangler:
When using the tool in the build to instantly generate a score, we need to have the SBOM in the right format, so this SBOM wrangler is the pure Python version of the SBOM Wrangler we have in Synapse. This part of the tool will only get used in GitHub as we already have our SBOMs wrangled in Synapse
- Ruleset Formatter
The ruleset formatter takes the JSON ruleset that is generated by the policy hierarchy manager and restructures the data into dataframes so it can be used by the SBOM Scorer
- SBOM Scorer
The SBOM Scorer is the main 'brain' of the tool. It uses the information generated by the other parts of the tool to score either singular or multiple SBOMs depending on how many accepted or rejected licenses they have.
First, the SBOM data is read in as a Pandas DataFrame. We merge the different policy hierarchy level's data using left merging, first with the repository level. If the name of the repository matches any of the policy names, it gets merged in. Then the same with organisation level, filling the gaps. And finally if there are any empty spaces, the company level table is merged in.
We then create an extra column for each of the categories in the policies 'accepted', 'rejected', 'copyright', 'overrideAccept' and 'overrideReject' which checks for each component whether it can find a match in each category or not.
raw_data['licenseAccepted'] = raw_data.apply(lambda x: x['License'] in x['accepted'], axis=1)
raw_data['licenseRejected'] = raw_data.apply(lambda x: x['License'] in x['rejected'], axis=1)
raw_data['copyrightAccepted'] = raw_data.apply(lambda x: any(item in x['copyright'] for item in x['CopyrightSplit']) if isinstance(x['CopyrightSplit'], (list, tuple)) and x['CopyrightSplit'] is not None else False, axis=1)
raw_data['override-accepted'] = raw_data.apply(lambda x: x['Name'] in x['override-rejected'] if x['override-rejected'] is not None else False, axis=1)
raw_data['override-rejected'] = raw_data.apply(lambda x: x['Name'] in x['override-accepted'] if x['override-accepted'] is not None else False, axis=1)
These columns then get sorted logically into one column called 'sorting' which, for each component, lists whether it is accepted, rejected or unknown:
raw_data['scoring'] = raw_data.apply(
    lambda x: 'Accepted' if x['override-accepted'] else
    'Rejected' if x['override-rejected'] else
    'Accepted' if x['licenseAccepted'] else
    'Rejected' if x['licenseRejected'] else
    'Accepted' if x['copyrightAccepted'] else
    'Unknown',
    axis=1
)
The 'override' checks go first, having the highest weighting.
The scores are then summarised into a CSV table similar to below:
| Repo Name | Accepted | Rejected | Unknown |
|---|---|---|---|
| Example 1 | 153 | 2 | 32 |
| Example 2 | 234 | 7 | 12 |
Outputted alongside the scores are the unknown and rejected tables:
| Component | License | Copyright |
|---|---|---|
| Example Component 1 | AGPL | |
| Example Component 2 | GNU General Public License |
If there are any rejected components in our GitHub build, then it is failed. If there are unknowns then warnings will be thrown.
Using the Scores
Now that we had our scores, we had to find a way to either display them or create an alert saying that something wasn't right.
Backstage
Backstage is an open source framework for building developer portals which was created by Spotify. Endjin uses it as it provides a unified view over all of the separate github organisations and repositories, so we decided it would be a good place to output our scores.
Backstage uses a plugin-based architecture. It allows you to create custom plugins to add new features and integrations. These plugins can integrate with current internal tools you use, or with third-party services. We brought in data from our Azure Data Lake Storage Gen2 account, and passed the data into tables to be displayed on both of the pages.
Backstage include UI customisation that you can align with your organisation's brand preferences, whilst still making it easy to have consistency between different people working on different pages.
Overview Page
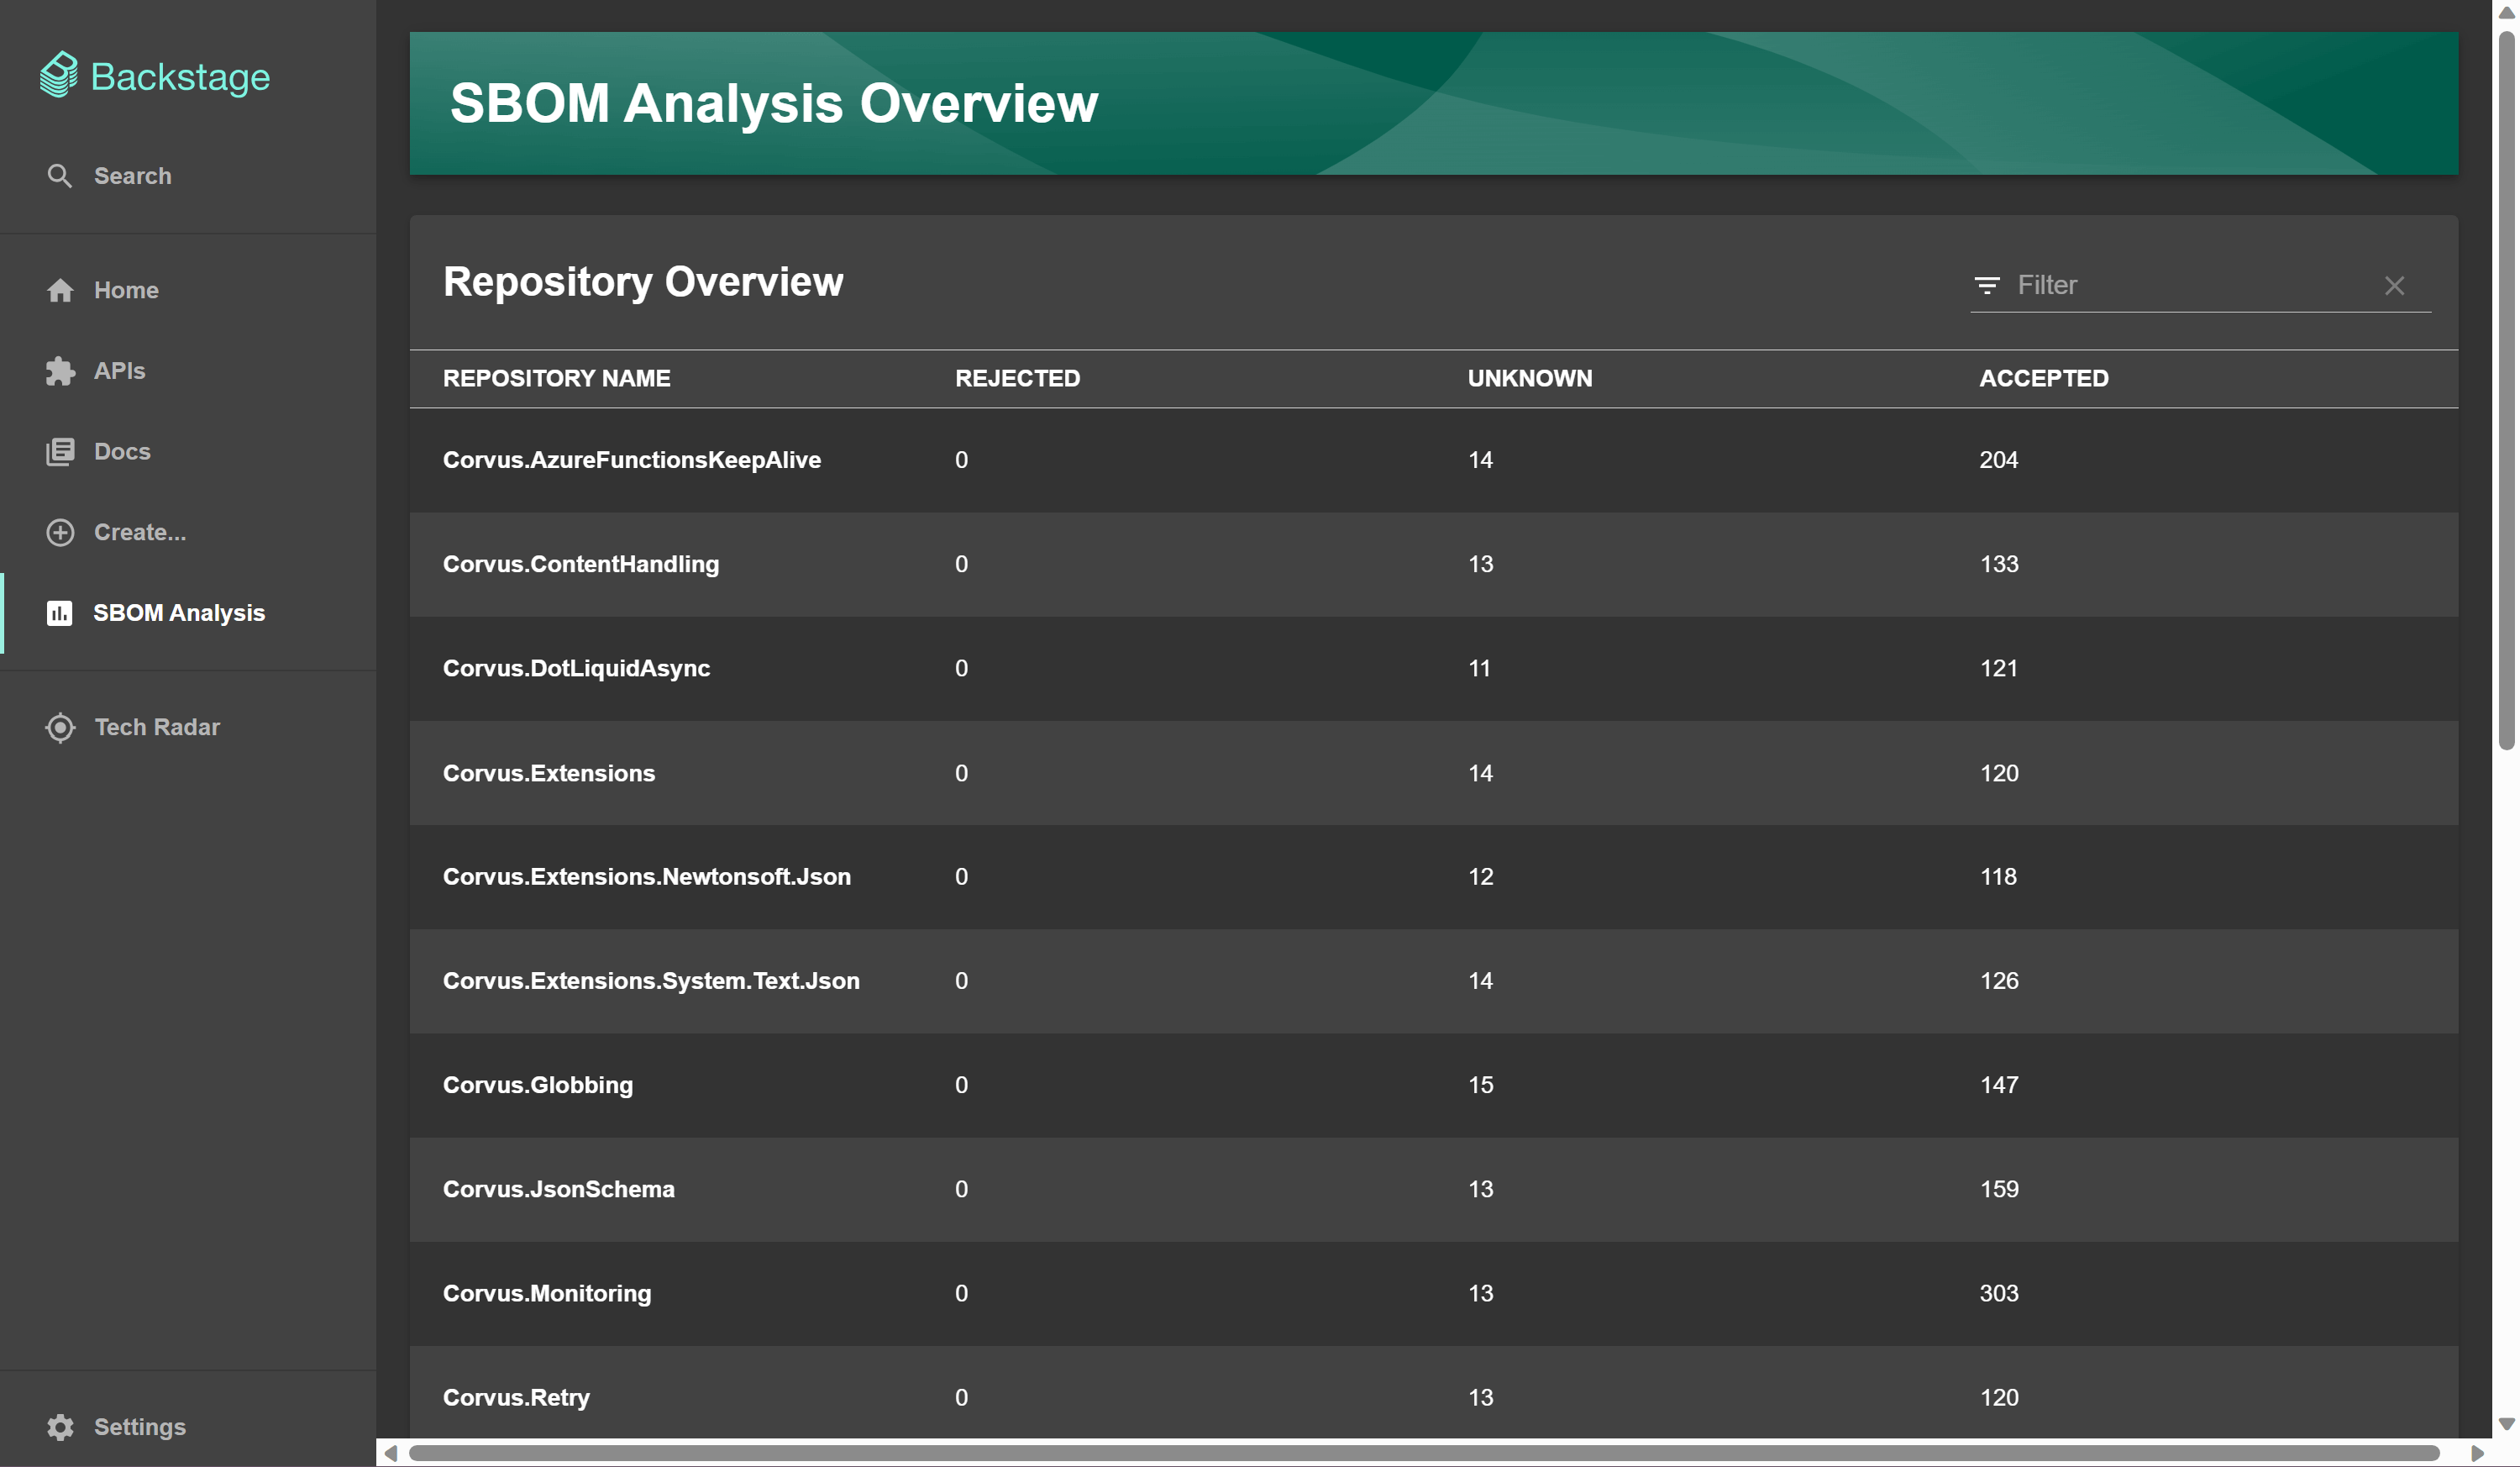
The first page we have in Backstage is the 'SBOM Analysis' summary page. I created this page and added components to it that Backstage provide as a template, these are like building blocks. Backstage offer a Storybook page that demonstrates the different components usages. The image below shows the tab to the left with the 'SBOM Analysis' page. This shows, from a top level view, all the repositories that are being checked, and how many rejected, accepted or unknown components they are using.
This makes it easy to spot the rejected components if scanning across the repos, as you can sort the rejected column from highest to lowest amount of rejected components.
Repository specific page
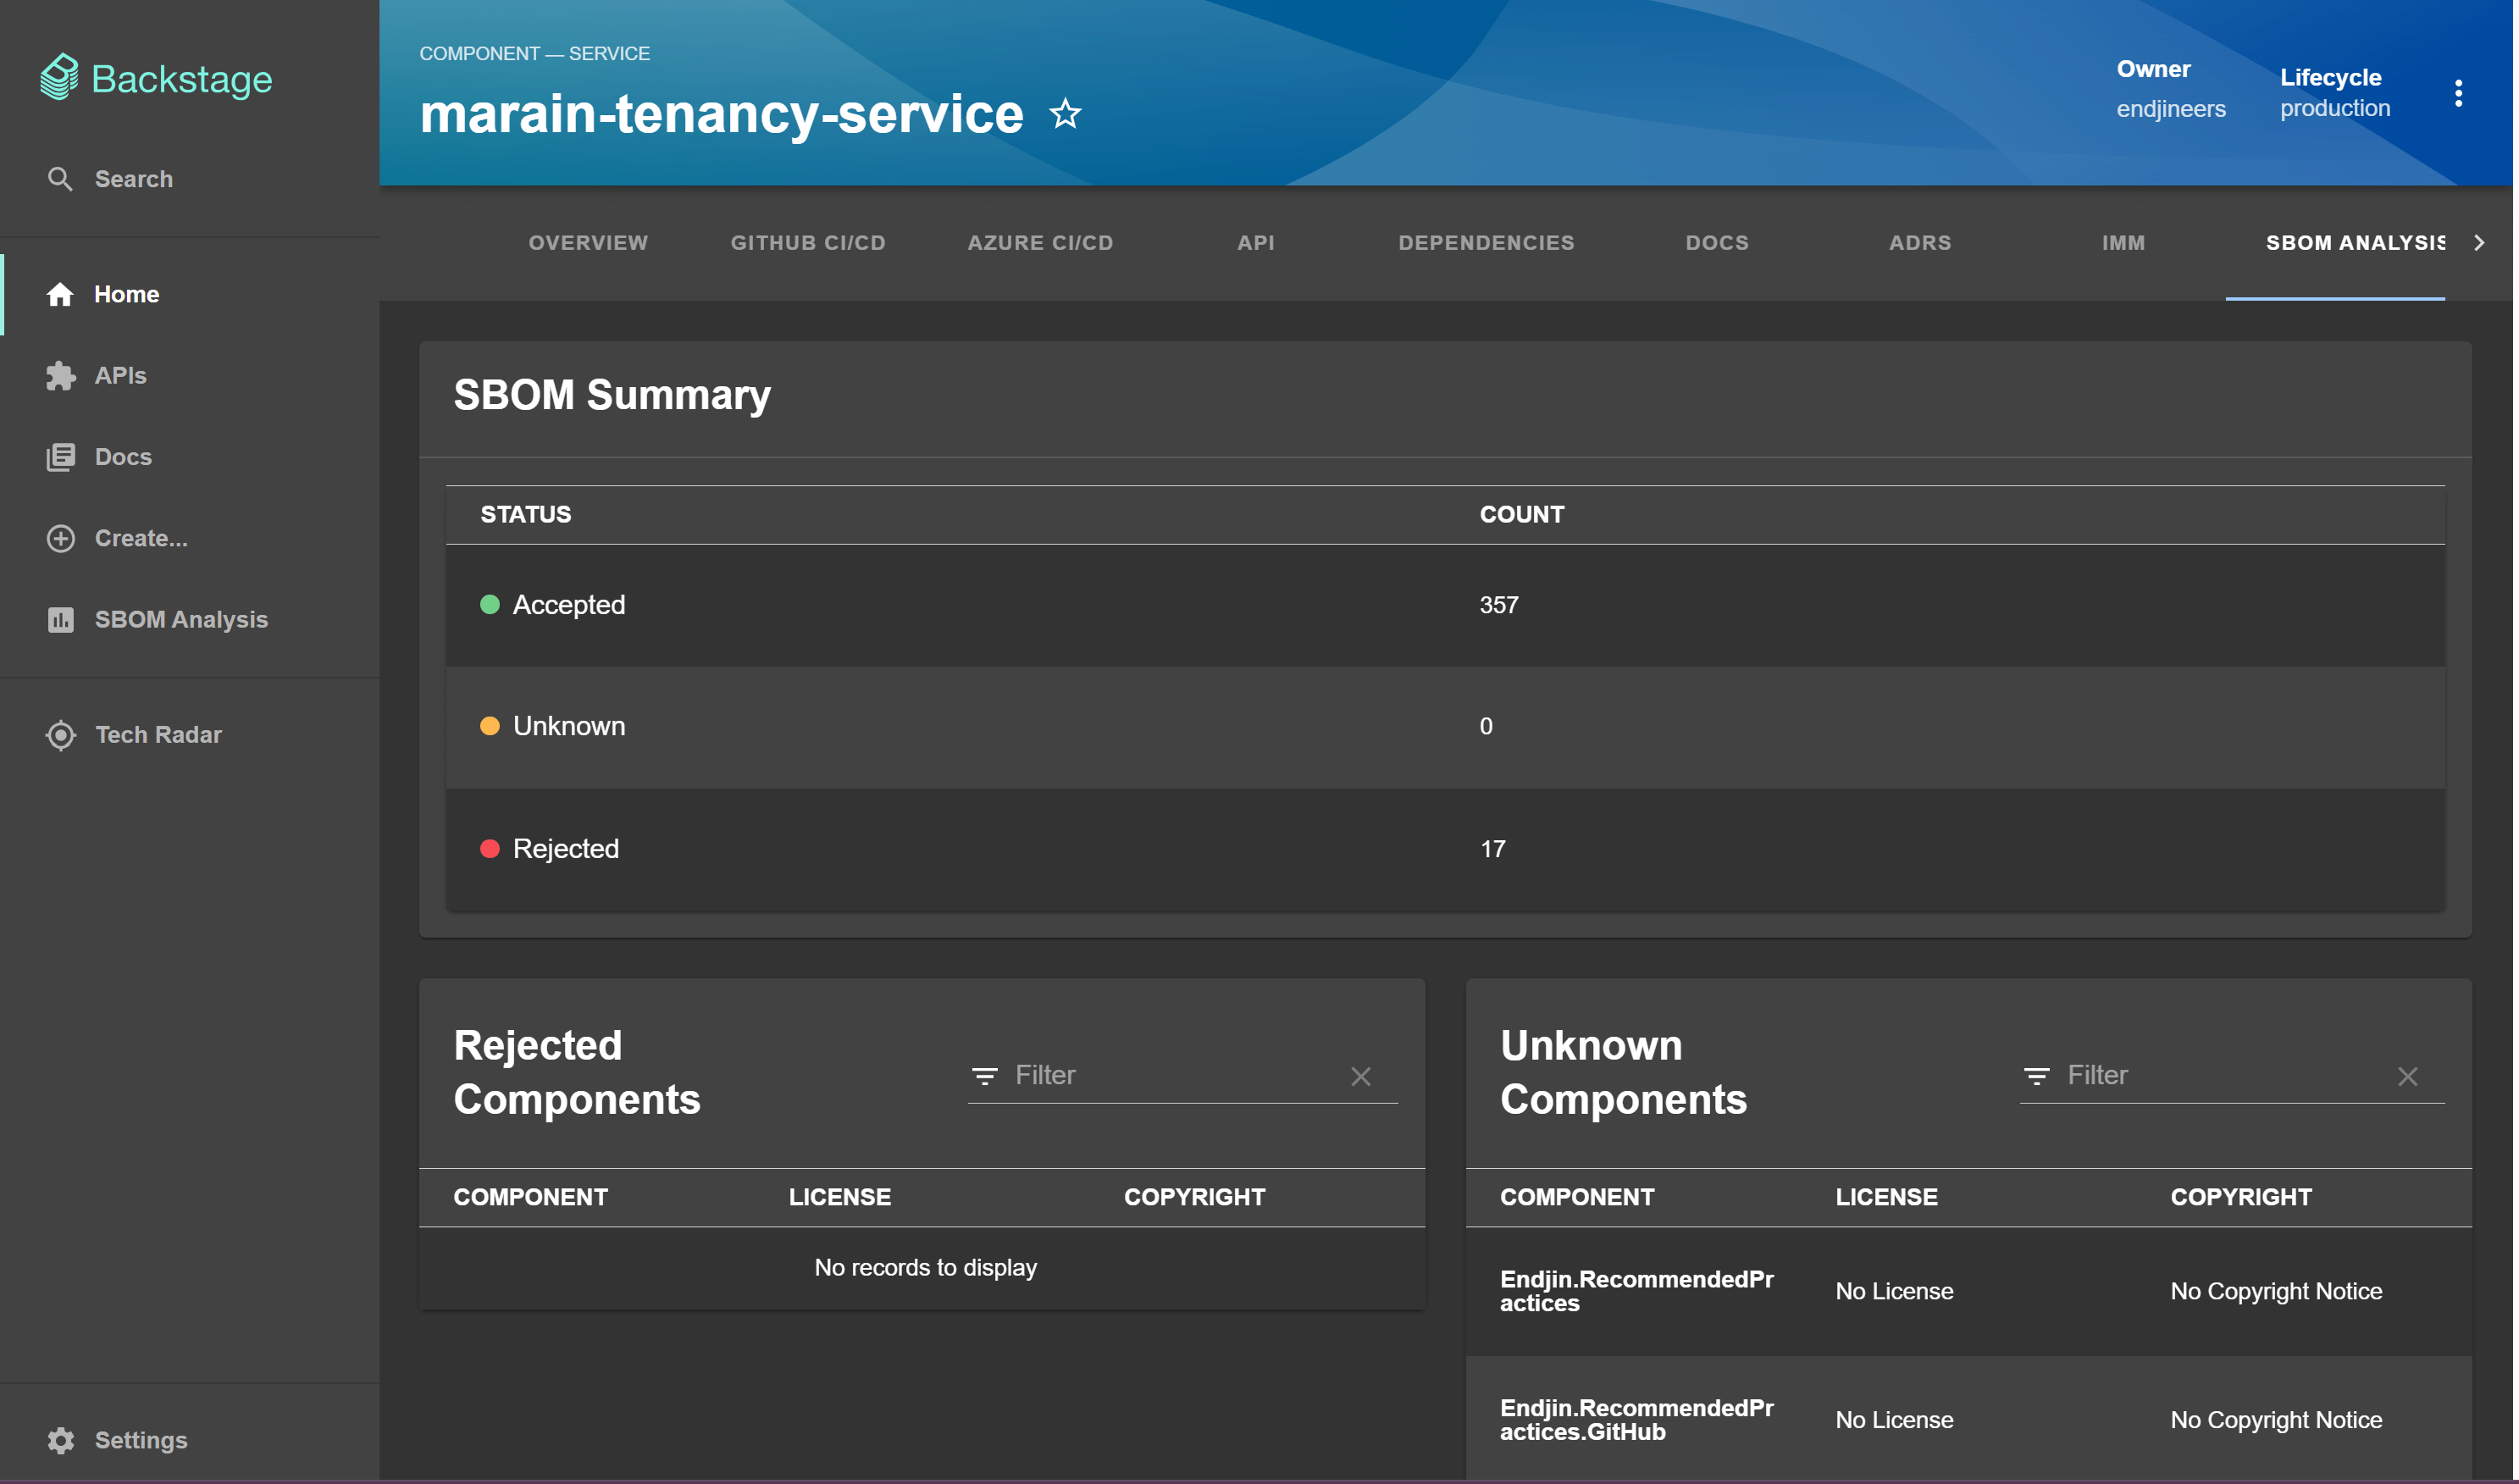
The second type of page we have in Backstage are the repository specific pages which give more information about each repository. I built this page also using the components from the Backstage Storybook.
Below is an example of one page in Backstage. We have the summary section, similar to the overview page, which contains the 'accepted', 'rejected' and 'unknown' counts. Below are the unknown and rejected components tables which display the components, their license and copyright. These are the files generated with the scores from the 'SBOM Analysis' package.
Slack message
In order to communicate changes to repositories, and any errors that might be flagged up, we set up a Slack app which will send daily messages to a channel with updates on the current state of the codebase.
I built this into my Synapse notebook 'SBOM Analyser', which generates the scores using the SBOM Analyser Python package.
We use the Python package 'requests' to post the response to Slack. You can build up your message in the body variable using information you've generated previously in the notebook. This runs last in the SBOM Analyser notebook so can access all the information generated by the SBOM Analyser package.
import requests
from azure.keyvault.secrets import SecretClient
if rejectedSlack == 0:
    icon = ':white_check_mark:'
else:
    icon = ':x:'
url = webhookurl
body = {
    "blocks": [
        {
            "type": "section",
            "text": {
                "type": "mrkdwn",
                "text": f"OpenChain SBOM status summary:\n{icon} There are {rejectedSlack} rejected components {icon}\n\n• *Accepted*: {acceptedSlack}\n• *Unknown*: {unknownSlack}\n\n<[URL to Backstage]| More details in Backstage>"
            }
        }
    ]
}
response = requests.post(
    url,
    json = body
)
print(response.text)
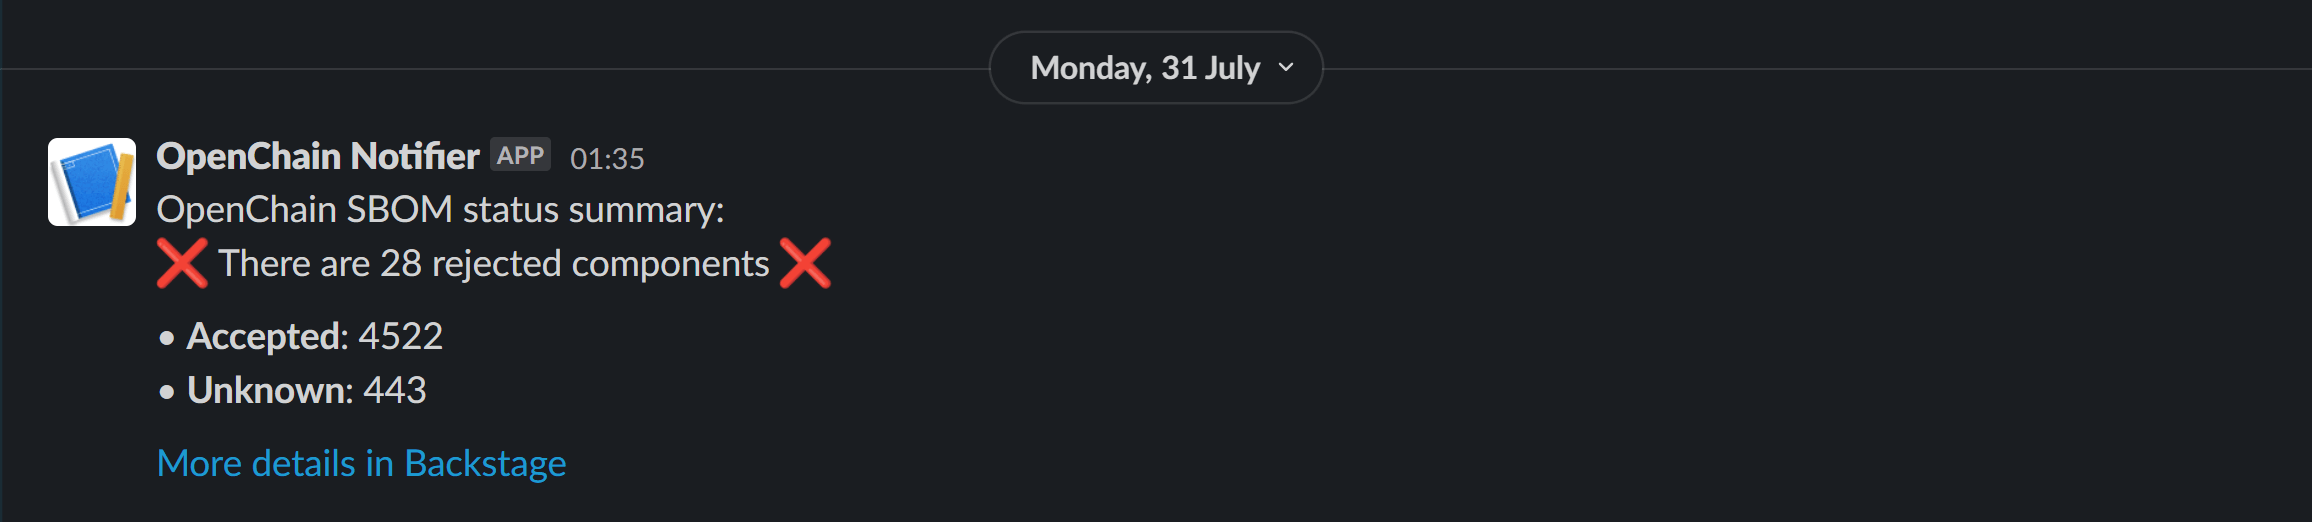
Below is a screenshot of our Slack channel #openchain-notifications which gives a daily update on the status. If there aren't any rejected components then the message will have green ticks.

Alternatively, if there are some rejected components the message will present itself with red crosses. I made the decision to structure the message like this as it was short and consise, with obvious icons showing whether it's passed or failed. This means if there is a problem, it's less likely to be missed as it's eye catching.
IMM (IP Maturity Matrix)
Endjin has developed a framework called the IP Maturity Matrix (IMM) that measures the engineering practices ‘quality’ of a repository, for example how much of it is documented or how much code is covered by tests. As part of the OpenChain project, we wanted to link in OpenChain to the IMM as a new category, so that it would show whether a repository generates an SBOM.
IMM scores for each repository are stored in an imm.yaml file, with these scores being manually created and updated. However, as we wanted to display whether an SBOM is being created and checked for each repository, we were automatically creating the data we needed, so had to create a process which would update these files for us. This was especially important; as it isn't a one-time update, our data is dynamic and can be updated from day to day.
Having already got processes from our build script manager that can update files across all our repositories, we decided to repurpose this for the new functionality. I rewrote the logic to instead target the imm.yaml files, if that repo had them, and update the SBOM scores we were accessing from our Azure Data Lake Storage Gen2. Then went through and set up the workflow, so that it can run daily on its own as a GitHub actions workflow. Now it updates all the yaml files to give insight into each one, whether they have an SBOM or not.
These IMM scores get added to the README for each repository, so if you're looking to use the open-source library, or need some information about it, you can get a quick overview of each one. This includes our SBOM score, meaning it can increase confidence in the code, knowing that the repository is being checked.
100% means that the repository is generating an SBOM, and it is being checked. 0% means that an SBOM isn't being generated.
Below is an image of what a repository could look like with an SBOM IMM score:

Wrapping up
Finishing my Year in Industry, I am wrapping up my work with the OpenChain project. We covered the ETL (Extract Transform Load) process: extracted and ingested our data, visualised our data, and used it against business rules to gain insight on the whole of our codebase. We added additional output locations, such as Slack messages and displaying as IMM scores, so we get instant feedback without having to look for it. We will get notifications through Slack when compliance is breached, meaning we are significantly reducing the risk of missing a threat to our license compliance.
Now we are able to fully track and manage our open-source license usage, satisfying one of the main points in the OpenChain specification. I hope to build on this work, by implementing OpenChain ISO/IEC DIS 18974 - the industry standard for open source security assurance programs, for my final year project in my upcoming final year at the University of York, where I will be completing my Bachelor of Engineering in Computer Science.